
GabrielSoft - How to set up G Suite for Education for your domain
Having email addresses for all your staff members can really simplify communication, and using an email address @ your domain name makes your contact information look much more professional than using @comcast.net or other general addresses.
Luckily, G Suite makes it easy to use their Gmail email service in conjunction with your domain name, so your users get the great experience this service provides while also being able to use custom email addresses. Even better, schools can get G Suite for free!
- 1
-
Get G Suite for Education
a. Visit the G Suite for Education website and click the Get Google Products button in the top-right to get started.
b. Then, select No when it asks whether you already use G Suite for Education
c. Select Yes, take me to products when it asks whether you have administrative access to your school's web domain.
d. Click the View Cart button, and click Set up Productivity Tools to start setting up your new FREE account.
 e. Now you'll sign up for your new account. Enter the information for you and your school on the first screen.
f. On the next screen, enter your domain name - you don't need to include the 'http://' or the 'www'
g. Finally, enter the information for your own user account. The username and password you enter into this form is how you will log in to manage all your G Suite for Education products. You will be able to add additional users/email accounts for your colleagues later. Once finished, click "Accept and signup."
 e. Now you'll sign up for your new account. Enter the information for you and your school on the first screen.
- 2
-
Verify your domain
a. Now that you've created your account, Google will ask if you want their help to set things up, or if you'd like to do it yourself. If you want to keep following the steps in this tutorial, click the Continue button under "Set up on your own"

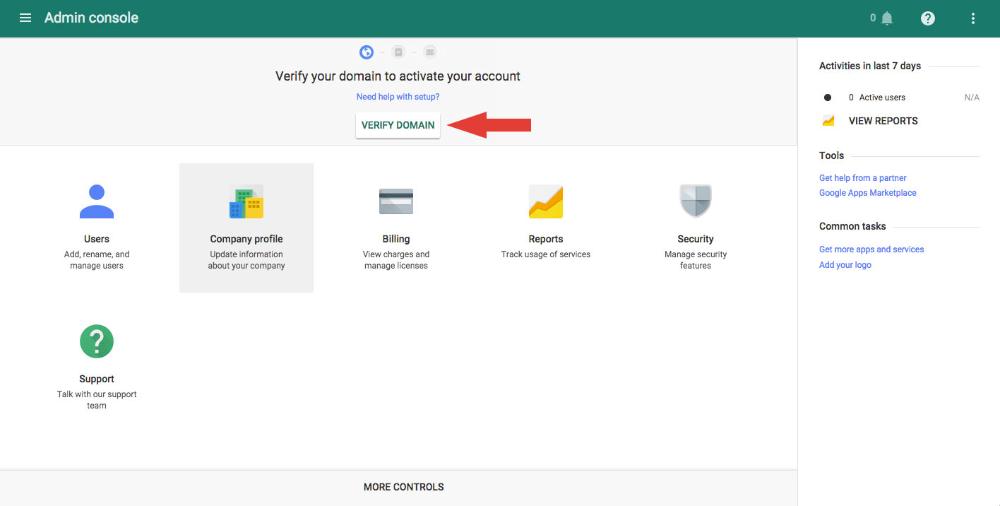
b. Now you'll be taken to your Admin Console. Click " START SETUP" at the top of the Admin console, and then click "VERIFY DOMAIN."
c. You have multiple options via which you can verify your domain. If your eCatholic website is currently LIVE at your domain, we'd suggest verifying your domain ownership by adding a meta tag. To get this, first select Other when Google asks who your registrar is (even if you know who it is) and then click BEGIN VERIFICATION
 Then, click the Alternate methods tab, and select the HTML tag option. Copy the meta tag value (illustrated below) provided by Google.
d. Then, open a new tab in your web browser, navigate to your eCatholic website, and log in as an Admin. Click on the Admin tab > Settings > Google/ <head> and paste the meta tag provided by Google into the "Domain Verification - Meta Tag Code" field (illustrated below). Be sure to click Save/Publish at the bottom of the screen.

e. Return to your Google Admin console and click Verify.
NOTE: The option of verifying your domain ownership by adding a meta tag will only be effective if your eCatholic website is presently LIVE at your domain. If your eCatholic website is NOT currently live at your domain, we suggest adding a TXT record to your DNS to verify your domain ownership.


 Then, click the Alternate methods tab, and select the HTML tag option. Copy the meta tag value (illustrated below) provided by Google.

- 3
-
Request the G Suite for Education Upgrade
a. As soon as you started your new G Suite for Education account, Google sends you an email with instructions on how to complete the process. It should have "Sign-up confirmation and upgrading to G Suite for Education" as the subject. Click the first link in Step 3 to complete the sign up process.
 b. Fill in the form to request the upgrade, making sure that you're signed in with the admin account you created in step 1. Then click SUBMIT. Google will send you an email once they've reviewed everything and the upgrade is complete!
 b. Fill in the form to request the upgrade, making sure that you're signed in with the admin account you created in step 1. Then click SUBMIT. Google will send you an email once they've reviewed everything and the upgrade is complete!
- 4
-
Add Users and Switch
a. Once your upgrade to G Suite for Education is approved, you'll be able to add the rest of your users. This Google article will guide you through the process. Once your users are added, they'll be able to login to their new Gmail accounts.
b. Once you're ready to switch, you'll just click the Set Up Gmail button at the top of your Admin Console and follow the steps they give you. This is what takes your new email LIVE and causes messages to start flowing into your new Gmail inboxes. If you need help with this step, be sure to give us a call. The G Suite Admin help center is a great resource if you need help making any changes to the new email going forward.