
GabrielSoft - How to set up G Suite for Nonprofits email for your domain
Having official email addresses for your staff (e.g., [email protected]) can simplify communication at your organization. Plus, using your official domain name with email addresses makes your contact information look much more professional than using a general address (e.g., [email protected]).
Here's how your nonprofit organization can sign up to use G Suite (i.e., Gmail and other Google services) with your domain name. After you complete the steps below, your staff will be able to use all the features of Gmail with your own custom domain name. And even better, it's free for nonprofits*!
* The steps below outline how to set up G Suite for Nonprofits. If your organization is NOT a nonprofit (such as a business) or if it is a school, you'll need to follow slightly different steps.
- 1
-
Sign up for a Google for Nonprofits account
As a first step, sign up for a Google for Nonprofits account. Once approved, you'll be eligible to enroll to receive G Suite (which includes Gmail) at no cost.

To begin, click the Get Started button at the top of the page. You will then be prompted to:
- Confirm your Google Account - Select the Google account you would like to be added as an administrator for your organization's Google for Nonprofits account (pictured below, left).
- Confirm that your organization is eligible to apply - Verify that your organization is not a school, healthcare organization, or governmental entity (pictured below, left).
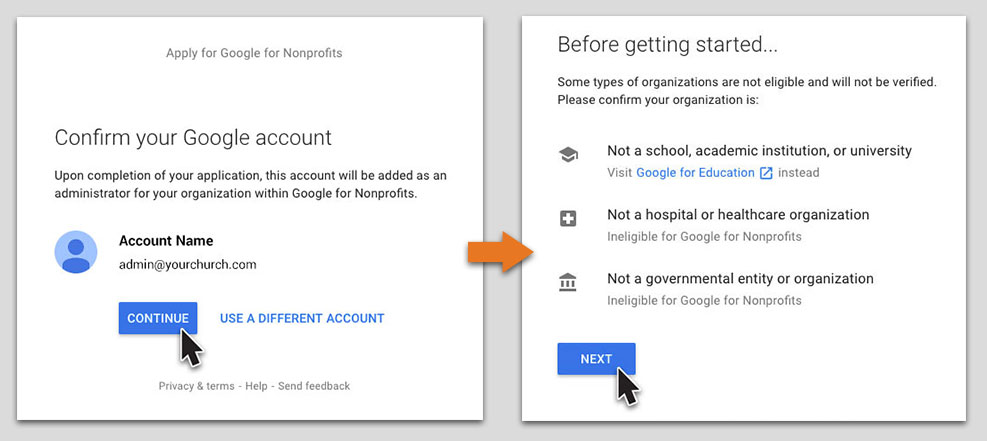
- Identify the country in which your organization is registered (pictured below, left).
- Click Get a validation token from TechSoup (pictured below, right).


- 2
-
Apply for a TechSoup validation token
All organizations must be validated as a nonprofit organization by TechSoup or the local TechSoup partner. After you click Get a validation token from TechSoup, you will be directed to a TechSoup Global Network webpage. Once there:
- Click New to TechSoup.org (pictured below, left).
- Click Sign up your NGO to get validated (pictured below, right).

- Complete the Join TechSoup form.
- When prompted, confirm your email address.
Next, be prepared to enter the following information about your organization when completing the Tell Us About Your Organization form (pictured below):

- Organization Status - Select 501(c)(3) nonprofit
- EIN or FSCS ID - Enter your EIN (Employer Identification Number)
- Organization Type - Use the dropdown menu to select Religious Activities
- Subtype - Use the dropdown menu to select Church, synagogue, or whatever best describes your organization.
Verify all details, then click Add This Organization (pictured below).

Once submitted, you must wait for your application to be validated by TechSoup, which can take up to 10 business days. You may also be asked via email to submit additional information to TechSoup (see below).
What you need to get approved by TechSoup
After you submit your application to TechSoup, you may receive an email from TechSoup saying they need additional documentation to verify your tax exemption. Most Catholic parishes and a number of Catholic institutions are included in a group tax exemption under the USCCB (and do not receive their own IRS determination letters).
In the case of Catholic parishes and institutions that are exempt under the Group Ruling, exemption can be verified by reference to the Official Catholic Directory (Kenedy Directory). As a result, you will need to attach the following in a reply:
- Group Ruling Determination Letter (you can download the most recent version on the USCCB website).
- A copy of the page out of the Official Catholic Directory (also called the Kenedy Directory) that lists your parish or institution. Your diocese should be able to provide this if you don't have a copy. To avoid confusion, we recommend referring TechSoup to the location of your entry in the file you send.


- 3
-
Obtain your TechSoup validation token
Once you're notified by TechSoup that your account has been validated, log in to your TechSoup account to obtain your TechSoup validation token. To do so, use the following steps:
- Click the User icon in the top right corner to select Your Account (pictured below).

- Once on the Account Details page, click Validation Tokens (pictured below).

- Then click the Google for Nonprofits link (pictured below).

Then, you will be prompted to:
- Identify the country in which your organization is located.
- Log in to your TechSoup account.
After logging in, you will be directed to a page that contains your TechSoup validation token. Click Copy, then paste the validation token into the Google For Nonprofits field (pictured below).

- Click the User icon in the top right corner to select Your Account (pictured below).


- 4
-
Complete your Google for Nonprofits account application
Now that you have obtained your TechSoup validation token, you can complete the process of signing up for a Google for Nonprofits account.
- Log in to your Google account once again to confirm your account and enter/paste your TechSoup validation token (pictured below).

- After Google has checked your token, review the list to see if your organization is already listed. If not, select My organization is not listed. Create new account.
- Then, proceed to enter your organization phone number, website, and contact details. You must also agree to the Google for Nonprofits terms and conditions.
Once your submission is received, you will receive an email from Google regarding the status of your application within 3 days.
- Log in to your Google account once again to confirm your account and enter/paste your TechSoup validation token (pictured below).

Wait for approval before you proceed ...
We recommend waiting until your Google for Nonprofits account is approved before moving on to the next step. The G Suite free trial period lasts 14 days, and waiting until your Google for Nonprofits application is approved will help ensure you can complete the setup within the 14-day trial period.
- 5
-
Sign up for a G Suite trial
Once your Google for Nonprofits account is approved, go to the G Suite website and sign up for a G Suite trial for your organization. Be prepared to provide the following information:
- Business Name - e.g., Abundant Life Church
- Number of Employees
- Country
- First Name
- Last Name
- Current Email Address - Be sure to use an existing email address via which you can immediately receive G Suite account setup emails. You will create new business email addresses later.

Next, select whether you:
- Plan to set up your organization's email accounts using a domain name you've already purchased
- If so, click Yes, I have one I can use, then enter your domain name (pictured below).
- Plan to buy a new domain name from Google for your email accounts.
- If so, click No, I need one and search for a domain name to purchase from Google. (Alternatively, you can purchase a domain from a different registrar, such as Name.com, then return to complete your G Suite setup with the new domain).

- Plan to set up your organization's email accounts using a domain name you've already purchased
The final prompts of the trial setup process will guide you to:
- Confirm the domain you wish to use to set up the account.
- Enter your preferred G Suite username + password.
- Agree the G Suite Agreement.
- Select a payment plan - You must choose a Business Plan and enter payment information until you are fully enrolled in G Suite for Nonprofits. Once your G Suite for Nonprofits application has been accepted, you will be able to utilize the G Suite tools at no cost.
- Accept the G Suite Terms of Service.
- Enter your First Name
- Enter your Last Name
- Enter your Current Email Address - Be sure to use an existing email address via which you can immediately receive G Suite account setup emails. You will create new business email addresses later.
NOTE: You may not need to enter payment information if your Google for Nonprofits application is submitted and approved before you create your G Suite account.
Once finished, it's time to set up your account. Click Continue To Setup (pictured below) to move to the next step.

NOTE: You will be able to add additional users/email accounts for your colleagues later in the process.


- 6
-
Set up your G Suite account
- Next, you'll be presented with a variety of options to continue. Click Use Manual Setup at the bottom of the screen (pictured below, left). This will open the Manual Setup dialog (pictured below, right). Click Go to Admin Console to proceed.
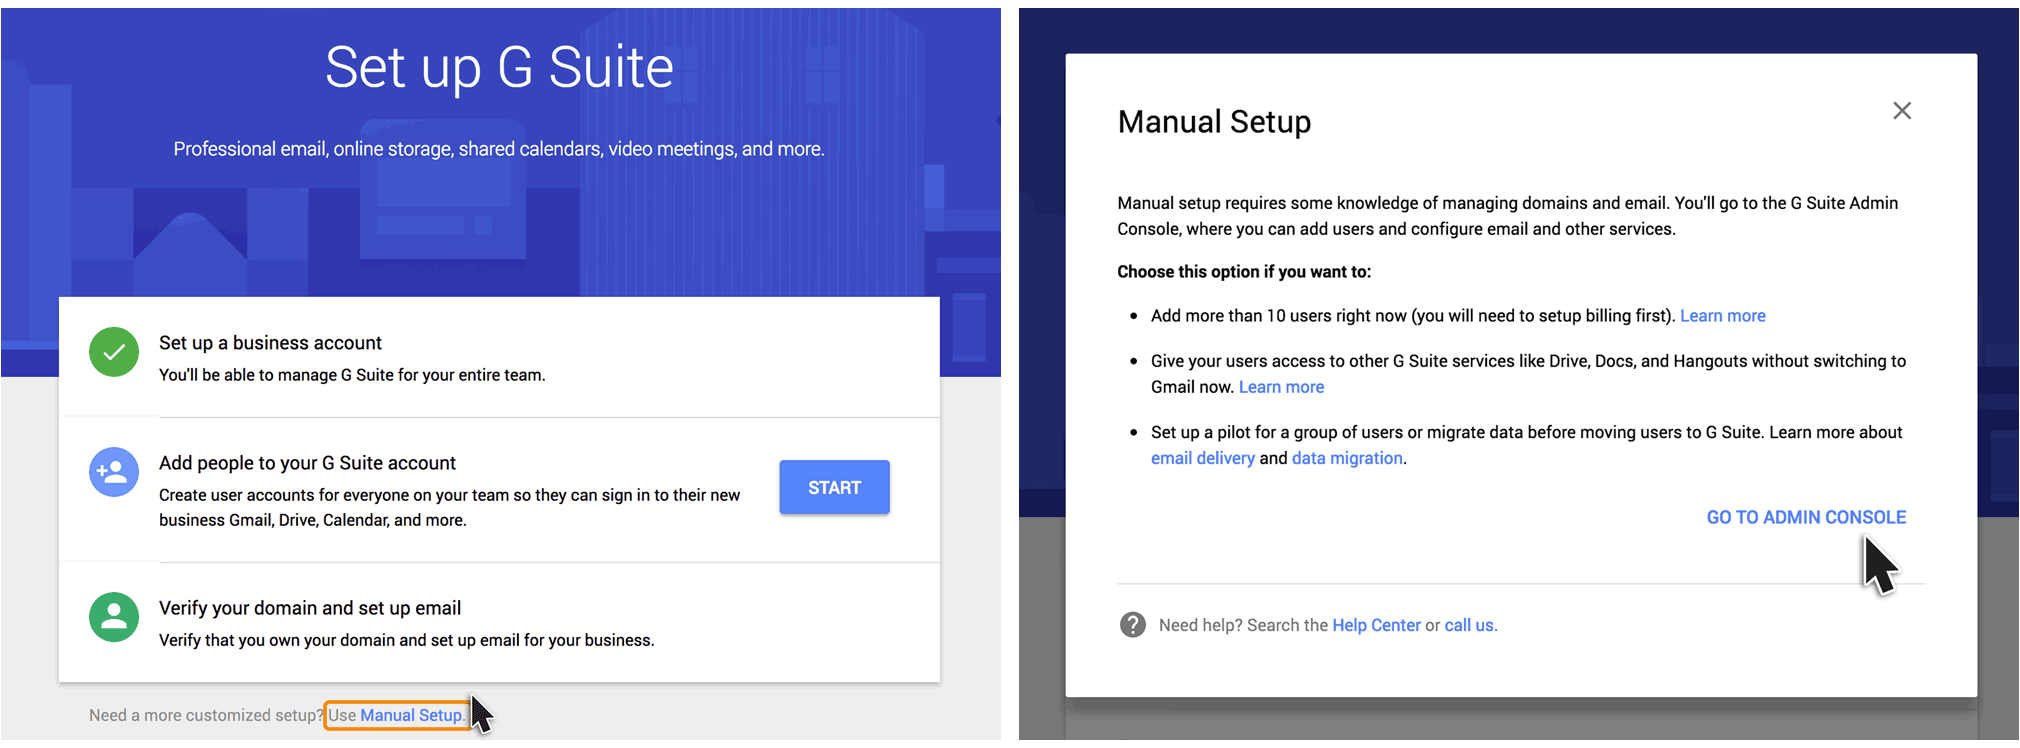
Once in the Admin Console, click Start Setup at the top of the Admin Console. Then, click Verify Domain (pictured below).

Two ways to verify your domain
There are two ways you can verify your domain ownership so that you can proceed with the G Suite setup:
- Add a meta tag to your homepage - *recommended - See full instructions
- Add a domain host record (TXT or CNAME) - See full instructions
The option of verifying your domain ownership by adding a meta tag (Option A) will only be effective if your GabrielSoft website is presently LIVE at your domain.
If your GabrielSoft website is NOT currently live at your domain, you may add a TXT record to your DNS (Option B) to verify your domain ownership.
Once your domain is verified, click Continue Setup to proceed.
- Next, you'll be presented with a variety of options to continue. Click Use Manual Setup at the bottom of the screen (pictured below, left). This will open the Manual Setup dialog (pictured below, right). Click Go to Admin Console to proceed.


- 7
-
Enroll in G Suite for Nonprofits
Once your Google for Nonprofits account is approved, you can use the following steps to enroll in specific products, including G Suite for Nonprofits (which includes Gmail). This enrollment is what allows your nonprofit to use G Suite at no cost.
- Sign in to your Google for Nonprofits account.
- Click on the Enrollments page in your account to enroll in products.
- Click the Enroll link below G Suite for Nonprofits to continue the process (pictured below).


- 8
-
Add users (email accounts)
Once Google has informed you that your G Suite for Nonprofits enrollment has been approved, you will be able to log in to your admin console at admin.google.com with your Google administrator account and password to begin setting up email accounts for individual users! This Google article will tell you how to do that if you need guidance. Once the users are created, your team will be able to log in to their new Gmail accounts.
Once you're ready to switch, you'll just click the Set Up Gmail button at the top of your Admin Console and follow the steps they give you. There will be instructions about updating your MX Records in your DNS Zones. This is what takes your new email LIVE and causes messages to start flowing into your new Gmail inboxes. If you are not familiar with DNS Zones or don't know where your DNS Zones are hosted, please email help
The Google Admin help center is a great resource if you need help making any changes to the new email going forward.